Saturday 28 January 2012

Icord - Free written pattern and Video tutorial

Icord - Can be made to any lengh you need
Great for hats and bags


Design by:  bobwilson123
Converted into written form by Dorian

Video Tutorial - http://www.youtube.com/watch?v=sQtTA4g2QqQ

Icord instructions:

     Tip:  to tighten the icord, pull up on 2nd loop on hook and then pull 3rd loop as you work.
a)      Ch 3, go into 2nd ch from hook, pull up loop, go into 3rd ch, pull up loop.
b)      Remove 1st two loops from hook and hold them.
c)      Ch 1, put next loop you’re holding back on hook, ch 1, put last loop you’re holding back on hook, ch 1.  You should end up with 3 loops on your hook. 
d)      Repeat steps b & c until you reach the desired length.
e)      Yarn over and pull through all 3 loops to fasten off.  Weave in ends.
     

Friday 27 January 2012

Free crochet pattern and video tutorial for the Granny on the straight

Scarf Crochet Tutorial - Granny on the Straight - Variation 1
Created by bobwilson123
Converted into written format by Tammy

YOUTUBE VIDEO TUTORIAL LINK:

WRITTEN PATTERN IN PDF FORM:
1- Go to the FREE DOWNLOADS bobwilson123 folder that is located on the left hand side and find the pattern you want.
2-Click add to cart. When you have all the patterns you want to download, click checkout. You will have to sign up to the website, but you only have to do this once.
3- Select PAYPAL as the payment (don’t worry its free, but you have to select a PAYPAL for it to work ) and then process the purchase.
4- After it has processed go to MY ACCOUNT and it will be under download
A BIG Thank you to Wendy for allowing my to have them on her website
PDF WRITTEN PATTERN LINK:


Skill level: Beginner+
Stitch abbreviations used in this pattern:
CH – Chain
DC – Double crochet
ST - Stitch
You can use any yarn with the recomended hook
I used 8ply/DK/Sports Weight and a 4mm/G hook
Yarn needle
Scissors
CHANGING COLORS:
To change colors during your project, you do so on the last stitch of your previous row worked.
Do so by completing the first part of your stitch.
Follow here:
To change to another color yarn on last stitch, Yarn over, insert hook into space, yarn over, pull through, yarn over and pull through 2 loops. Now loop the new color yarn over your hook and pull through remaining 2 loops on your hook.
Drop previous color used in back of work along with tail of new color yarn and continue on with your pattern. Make sure to pull on your ends a little to secure your work. Remember to weave in your ends, either when all done or you can work over the tails of yarn as soon as you change colors to avoid doing it all later.
Chain multiple:  4
To start, chain in multiples of 4 until you reach your desired width.
Row 1:  DC into 4th chain from the hook. DC again in the same st. CH-1, skip 3 chains,  3DC in next chain, *(CH-1, skip 3 chains, 3DC in next chain)* Repeat from * to * ending with 3DC in last chain space.
Row 2:  CH 4 (counts as 1st DC and CH-1), turn work. 3DC into next chain space, CH-1, *(3DC into chain space, CH-1)* Repeat from * to * ending with 1DC into very last stitch (top of ch-3 from previous row)
**Note: When you START a row with 1DC you END the row with 1DC.  Same if you START a row with 3DC you END with 3DC. (Chain 4 is 1 dc + ch)
Row 3: CH 3, work 2DC into chain space, CH-1, *(3DC into chain space, CH-1)*  Repeat from * to * across, ending with 3DC. (To give a nice edge, work 2DC into space and 3rd DC into top of CH-3 from previous row)
Alternate between Row 2 & 3 until you reach the desired length of your scarf.

Crochet Eyelet written pattern and video tutorial

Crochet Eyelet Beanie with Brim
Free written pattern and video tutorial 
http://www.bobwilson123.org/hats.html


Tuesday 24 January 2012

Crochet Rossette Flower - Free written pattern and video tutorial


ROSETTE FLOWER


Designed by Bobwilson123
Converted into written format by Daisy


WRITTEN PATTERN IN PDF FORM:

1- Go to the FREE DOWNLOADS bobwilson123 folder that is located on the left hand side and find the pattern you want.

2-Click add to cart. When you have all the patterns you want to download, click checkout. You will have to sign up to the website, but you only have to do this once.

3- Select PAYPAL as the payment (don’t worry its free, but you have to select a PAYPAL for it to work ) and then process the purchase.

4- After it has processed go to MY ACCOUNT and it will be under download

A BIG Thank you to Wendy for allowing my to have them on her website

PDF WRITTEN PATTERN LINK:
http://nannys-knit-n-sew.com/index.php?route=product/product&path=55&product_id=161
Materials
Crochet Hook
Yarn, color of your choice
Scissors
Darning needle.
Tape measure

Advan
ced beginner

You could do this flower in any yarn and needle and any length you desire.  If you’re going make a few of these Rosette flowers, it’s a good idea to write down how many chains you did and what length they were.

Single crochet or Crab Stitch or Rope Stitch as it is also known as, works from left to right.  So you’ll be doing single crochet backwards. 

Insert the hook, from front to back, in the next stitch to the right.  Making sure the right side of your work is facing you. Yarn Over and draw the yarn through the stitch.  Yarn over and draw the yarn through the 2 loops on the hook.  One reverse single crochet is now complete. 

US Terms
SC - Single Crochet
RSC - Reverse Single Crochet
Ch – Chain

Row 1: Make a slip knot and ch for 60cms or whatever length you wish.

Row 2: Sc in 2nd ch from hook and in every ch across, ch1 DO NOT TURN because you will be working backwards

Row 3: Ch1 counts as first sc. RSC across all your sc stitches from row 2 to the end.  Fasten off leaving a tail 30 cms long.

Sowing up your flower

Wrap/roll your flower little at a time and sow bottom edge.  Sow it every three stitches and through two layers, then wrap a bit more and so on.  Every now and then flip your flower over and check top of flower to see if the RSC part is level or how you want it.  When you get to the end sew in your ends or leave a tail for attaching to a hat, bag, scarf and I am sure you could find a lot of other items to attach your flower 


Crochet Soda Can/Coffee Cup Cozy - Free Written Pattern and video tutorial

By: BobWilson123
Converted into written format by Kelly


WRITTEN PATTERN IN PDF FORM:

1- Go to the FREE DOWNLOADS bobwilson123 folder that is located on the left hand side and find the pattern you want.

2-Click add to cart. When you have all the patterns you want to download, click checkout. You will have to sign up to the website, but you only have to do this once.

3- Select PAYPAL as the payment (don’t worry its free, but you have to select a PAYPAL for it to work ) and then process the purchase.

4- After it has processed go to MY ACCOUNT and it will be under download

A BIG Thank you to Wendy for allowing my to have them on her website

PDF WRITTEN PATTERN LINK:
http://nannys-knit-n-sew.com/index.php?route=product/product&path=55&product_id=152
Materials needed:
Yarn of your choice
Hook size that corresponds to the yarn
Soda can for measurement
Optional: measure tape

Dimensions:
For standard 12oz. can
4inx7.5in or 10cmx19cm

Pattern:
This pattern is using demonstrated using 8ply or sport weight and DK or worsted weight yarn
For the 8ply a G (4.00mm) hook and for worsted a I (5.50mm) hook has been used
The worsted weight will be in brackets – ( )

1.       Chain 21(16) or enough to cover can from top to bottom

2.       SC into 2nd chain from hook and across all 20(15) stitches.

3.       Ch 1, turn, Sc tbl (through back loop only) on all 20(15) stitches.  This will create a ribbed effect that will stretch. (Ch1 does not count as stitch.)

4.       Repeat row 3 till cozy is 7.5in (19cm) long or until cozy wraps around can/cup with about 0.5in (1cm) to spare, this will cause cozy to stretch to make it tight around can.

(You can whip stitch or sew ends together)

5.       Place RS (Right sides) together and slip stitch sides together evenly, by inserting hook into first stitch on front side to first stitch on back side, work even till stitching is complete.

6.       Weave in ends and enjoy!

Crochet Leg warmers - Free Wittern pattern and Video Tutorial


Leg-warmers in Ribbed Stitch

Designed by Bobwilson123
Converted into written format by Daisy
Video Tutorial - http://www.youtube.com/watch?v=u_ty0MngeRs
 

WRITTEN PATTERN IN PDF FORM:

1- Go to the FREE DOWNLOADS bobwilson123 folder that is located on the left hand side and find the pattern you want.

2-Click add to cart. When you have all the patterns you want to download, click checkout. You will have to sign up to the website, but you only have to do this once.

3- Select PAYPAL as the payment (don’t worry its free, but you have to select a PAYPAL for it to work ) and then process the purchase.

4- After it has processed go to MY ACCOUNT and it will be under download

A BIG Thank you to Wendy for allowing my to have them on her website

PDF WRITTEN PATTERN LINK:


EASY Materials
4mm crochet hook
DK/8ply yarn, color of your choice
Scissors, Darning needle

A tape measure
Optional a Stitch Marker

US Terms
SC - Single Crochet
HDC - Half Double Crochet
BLO - Back Loop Only
Ch - Chain
FO - Fasten Off

We will be working this pattern from side to side. Top to bottom of leg in other words.

You need to measure from below your knee to your ankle.   You can have it as long as you like remembering it will scrunch down a bit and so you may want to add extra chains when you start.   You may if you wish add elastic at the top to keep them up.  It’s entirely up to you.

Pattern starts with 10 SC and ends with 10 SC.  HDC in the middle. 
I would highly recommend reading this pattern BEFORE you start

Make two the same

Row 1: Ch the amount of CH’s you need for the length you want your legwarmer

Row 2: SC in 2nd ch from the hook and the next 9 stitches
You can place an optional stitch marker after last SC. 
As you go on in rows you will notice that the hdc is higher than the single crochet and you may be able to see where to change from SC to HDC.

HDC across until you reach your last 10 stitches, mark last HDC if you need to, SC in the next 10 SC to the end. Ch1 turn.

Row 3: SC in to the next 9 stitches in BLO, HDC in BLO in to every HDC, SC in the last 10 SC into BLO, ch1 turn.

Row 4: Repeat row 3 until leg warmer is wide enough to fit around your leg.  FO leaving a 30 to 40 cms long tail of yarn for sowing up your edges.  

Line up your two SC edges together and whip stitch through the loops edges to join.  Finish.

Crochet Tea Pot Cozy/warmer - Free written pattern and video tutorial

Crochet Tea Pot Cozy/warmer


Thank you to Dimple for sharing this wonderful photo of her Tea Pot Cozy


Pattern designed by bobwilson123
Converted to written form by Daisy
Video Tutorial and free written pattern 


Crochet Cast of Crew Cap - Free written Pattern and Video Tutorial


Cast of Crew Cap

Designed by bobwilson123
Converted to written format by Mackena

HUGE thankyou to Jenna for this awesome photo of her hat :)


Free written pattern and video tutorial 


Crochet Neckwarmer and Beanie all in one Free Written Pattern and Video Tutorial


Neck warmer/ Beanie


Design by:  bobwilson123
Converted into written form by Dorian
Video Tutorial - http://www.youtube.com/watch?v=DSAFNJHxbhI


WRITTEN PATTERN IN PDF FORM:

1- Go to the FREE DOWNLOADS bobwilson123 folder that is located on the left hand side and find the pattern you want.

2-Click add to cart. When you have all the patterns you want to download, click checkout. You will have to sign up to the website, but you only have to do this once.

3- Select PAYPAL as the payment (don’t worry its free, but you have to select a PAYPAL for it to work ) and then process the purchase.

4- After it has processed go to MY ACCOUNT and it will be under download

A BIG Thank you to Wendy for allowing my to have them on her website
PDF WRITTEN PATTERN LINK:
http://nannys-knit-n-sew.com/index.php?route=product/product&path=55&product_id=144


Materials used:   
2 strands of 8ply/Double Knit yarn for thickness and 4mm crochet hook
OR 1 stand of worsted weight yarn and a 5.00mm hook
 Tapestry needle

Abbreviations:     ch = chain;   hdc = half double crochet;   sc = single crochet

Notes:  1) You could use a sc instead of hdc for this pattern.  2) The project may curl up in the beginning, but should flatten out as more rows are added. 3) Working through the back loops will create a ribbed effect.


a)      Make a chain that will measure from the crown of your head down the side (to where you want the beanie to end).  Add about 2 extra inches to the chain to create the cuff.
b)      Row 1:  hdc in 2nd ch from hook.  Put a hdc in each remaining ch. Ch 2, turn.
c)      Row 2:  hdc into the back loop of the 2nd stitch. Repeat this in the back loop of each stitch across the row. The last hdc goes in the ch from the previous row.  Ch 2, turn.
d)      Repeat Row 2 until the piece is long enough to wrap around your head.  Fasten off leaving about a 12in tail.
e)      Fold the piece, lining up the first & last rows.  Using a tapestry needle & the 12in tail, sew through the back loops of the front piece & both loops of the back piece. Continue sewing across each stitch until the end of the row.  Weave in the ends.
f)       Fold up the cuff.
g)      Tie for top of beanie:  make a chain about 2ft long (about 60cm). Fasten off or leave it
until you’re sure of the length.  You could also make an icord – instructions below.
h)      Weave chain in/out of stitches all around the top of beanie using a crochet hook.
i)        Take 2 ends of tie & pull to gather top of beanie. Tie how you’d like & weave in the ends.
j)        Untie the top to slide down & wear as a neck warmer.


Icord instructions:
a)      Ch 3, go into 2nd ch from hook, pull up loop, go into 3rd ch, pull up loop.
b)      Remove 1st two loops from hook and hold them.
c)      Ch 1, put next loop you’re holding back on hook, ch 1, put last loop you’re holding back on hook, ch 1.  You should end up with 3 loops on your hook. 
d)      Repeat steps b & c until you reach the desired length.
e)      Yarn over and pull through all 3 loops to fasten off.  Weave in ends.
     
     Tip:  to tighten the icord, pull up on 2nd loop on hook and then pull 3rd loop as you work.

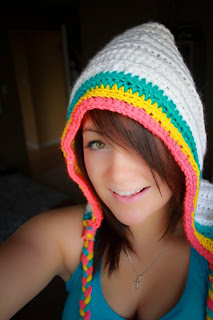
Crochet Hoodeanie- Hood cross with a beanie - Written Pattern and Video Tutorial


Designed by Bobwilson123
Converted into written format by Remy


WRITTEN PATTERN IN PDF FORM:

1- Go to the FREE DOWNLOADS bobwilson123 folder that is located on the left hand side and find the pattern you want.

2-Click add to cart. When you have all the patterns you want to download, click checkout. You will have to sign up to the website, but you only have to do this once.

3- Select PAYPAL as the payment (don’t worry its free, but you have to select a PAYPAL for it to work ) and then process the purchase.

4- After it has processed go to MY ACCOUNT and it will be under download

A BIG Thank you to Wendy for allowing my to have them on her website

PDF WRITTEN PATTERN LINK:


Intermediate
Materials
6mm/J hook and 2 x DK/8ply yarn, color of your choice
OR 1 strand of worsted weight yarn a and a 6mm/J hook
5mm/H hook
Scissors, Darning needle
A tape measure
Optional a Stitch Marker

After the first row you will be working into the BLO for the entire project

US Terms
Ch - Chain
HDC/hdc - Half Double Crochet
BLO - Back Loop Only
FO - Fasten Off
INC/Inc – increase/ 2 stitches into the same stitch
Using 6mm/J hookCh st until desired length   (measure from the top of the head to bottom of the neck or shorted if you don’t want your hood so long)

Row 1 -hdc at the 2nd ch from the hook, hdc across till the 2nd last st
6   hdc in the last st, DO NOT TURN you will be working down the other side of the chain, continue with hdc across

Row 2 - ch 2, turn, hdc into the BLO into each stitch until you get to the 6 stitches that you did in the last chain form the previous row. Inc into the next 6 hdc, 1 hdc into each stitch across and in the turning ch2

Row 3 – ch 2, turn, hdc across until you get to the increase section from the previous row – over the next 12 stitches you are going to do – 1 hdc into the next 5 hdc, inc in the next hdc , increase in the next hdc , 1 hdc in the remaining hdc across and in the turning ch2

Row 4 - ch 2, turn, hdc into each hdc and in the turning ch2

Row 5 – Repeat row 4 until the hoodeanie is 2 rows shorter than desired size

Using 5mm/h hook, 1 HDC into each HDC working though both loops  (this will shape to the face)
You can add more Hdc rows if you like
Around the bottom edge work 1 or 2 rows of hdc

Cut 12 stands of yarn approx 60 cm/24 inches long
Using 6 stands on each tie, fold yarn the 6 strands in half and attach to front corners of hoodeanie and braid. Secure ends with some scrap yarn in the same color


Hoodeanie

Join me on Google Plus